Участник:Semorerith: различия между версиями

Материал из Infinity Project
Перейти к навигации Перейти к поиску
(Подготовка к публикации)
 
(не показано 45 промежуточных версий 2 участников)
Строка 1: Строка 1:
{{Gameplay Guides}}
+
Отдел снабжения состоит из руководителя - [[квартирмейстер|квартирмейстра]] или начальника палубы, [[карготехник|карготехников]] и их ассистентов и [[Шахтер|шахтеров]]. Работа начальника и техников состоит в том, чтобы обслуживать ангар и шаттлы, а также обрабатывать заказы и транспортировать поставки из шаттла снабжения. Это руководство не распространяется на геологоразведчиков, у них есть [[Руководство старателя|отдельное руководство]] по добыче полезных ископаемых, и их взаимодействие с начальником палубы и техническими специалистами, как правило, заключается только в передаче добытых товаров для доставки. Руководить поставками напрямую может также капитан или Глава Персонала, при необходимости.
  
This guide will cover the use of the [[File:circuit_printer.png]] '''Integrated Circuit Printer''', an extremely versatile item that allows production of customized items called [[File:setup_large_arm.png]] '''assemblies'''. Assemblies have a wide range of possibilities, limited only by the player's imagination and the size of the assembly. It is possible to produce specialized signalers, intelligent augments for implantation, explosives, medicine dispensers, mobile robotic minions and much more. Some example circuits will be included at the end of this guide.
+
Грузовой отсек находится на нижней палубе, хотя складские работники могут доставлять посылки по всему кораблю. Они также имеют доступ к переработчику мусора на второй палубе, возле инженерного отдела.
  
Creating a new integrated circuit can take some time, and for the more complex types requires a basic knowledge of how logic works in [https://en.wikipedia.org/wiki/Boolean_algebra boolean algebra]. However they can be easily copied and brought into future rounds. It can represent an interesting puzzle to implement your desired functions within the, quite restrictive, limits of the assembly sizes.
+
== Необходимые предметы ==
  
Assemblies can be extremely powerful, make sure to be creative and have fun making your circuits, but remember the [[rules]] and don't stray into [[Rules#rule-server-7|powergaming]] or [[Rules#rule-server-1|griefing]] with circuits.
+
В шкафчиках отдела снабжения можно найти:
  
== Tools ==
+
* Две гарнитуры, позволяющие получить доступ к каналу снабжения (:u).
 +
* Темные рабочие перчатки.
 +
* Оранжевый жилет (Помните, что вы должны носить такой жилет во время работы на посадочных площадках в ангаре!)
 +
* Большая разгрузка с карманами
 +
* Пояс для инструментов.
 +
* Ручной принтер этикеток.
 +
* '''Маркировщик для посылок''' (destination tagger)
 +
* Папки.
 +
* '''Упаковочная бумага''' (обычная и подарочная)
 +
* Жезл регулировщика
 +
* '''Резиновая печать карго-отдела для разрешений'''
 +
* Красная печать для запретов
 +
* Рюкзак
 +
* Сумка
  
*[[File:circuit_printer.png|32px]] Producing integrated circuits all starts with an '''integrated circuit printer'''. This item is found in the research and robotics labs, or produced from a [[protolathe]]. Interacting with it opens a UI that allows you to print all the parts required for the creation of integrated circuits, and the tools for attaching them together. It also allows for cloning of circuits. The printer uses [[steel sheets]] and can recycle unwanted circuits and components.
+
== Консоль управления поставками ==
*[[File:upgrade_disk.png]] The integrated circuit printer initially has many options crossed-out. These are more advanced components and must be unlocked by using an ''' 'integrated circuit printer upgrade disk - advanced designs' ''' on the printer. This disk is printable from the [[protolathe]] with sufficient research.
 
*[[File:upgrade_disk_clone.png]] Cloning circuits can take minutes for the more complex varieties. The ''' 'integrated circuit printer upgrade disk - instant cloner' ''' allows for instantaneous cloning of integrated circuits. It is printed from a [[protolathe]] with sufficient research.
 
*[[File:wirer-wire.png]] Interacting with an opened assembly casing using the '''circuit wirer''' allows you to connect the various components within together, and is essential to creating integrated circuits. This can be found in the research and robotics labs, or printed from the integrated circuit printer. Pressing {{kp|Z}} toggles the wirer/unwirer mode and removes the previously selected pin.
 
*[[File:debugger.png]] The '''circuit debugger''' can save you a great deal of time when creating integrated circuits. Interacting with it allows you to set an input number, string, reference or null and then set this on the input of a component. This is useful in setting constants and testing the operation of your circuit. It is found in the same places as the circuit wirer.
 
*[[File:detailer.png]] The '''circuit detailer''' allows you to adjust the colour of your assembly casing. It is found in the same places as the circuit wirer.
 
*[[File:circuit_analyzer.png]] The '''circuit analyzer''' allows you to obtain a set of instructions for the integrated circuit printer that will allow you to clone your circuit by using the '''Load Program''' button in the printer UI. This text can be saved externally for use in future rounds. You can use the analyzer on circuits other people have created. Adjusting this text is sometimes simpler than editing the circuit directly with a circuit wirer.
 
  
== Assemblies ==
+
Консоль снабжения является центральной в вашем отделе и позволяет вам заказывать необходимое, управлять челноком для снабжения и просматривать историю заказов на поставку. Здесь вы можете узнать, что было заказано, когда и кем. Вы также можете распечатать ведомости заказов на поставку для сохранения и штамповки.  
There are many types of assemblies, which act as containers for your integrated circuits. Assemblies each have a '''space''' (physical internal volume) and a '''complexity''' (a cap on the amount of complicated circuits you can include) and some additional features based on the shape of the assembly, (e.g. The one that resembles a PDA can have an ID Card inserted.)
 
  
Assemblies fit into four main categories: Assembly, Mechanism, Machine and Drone.
+
Вы также можете утверждать / отклонять заказы других людей, что является важной частью вашей работы. Не стоит просто утверждать всё без уважительной причины. Или можно наоборот завоевать общее признание, поставляя дорогие товары просто так.
  
'''Assembly'''-class Assemblies are the smallest in space and complexity, but have some features based on their small size. Such as the ability to fit in belt or PDA slots, or inside an augment.
+
Эта консоль также позволяет проверить текущее количество очков поставки. Этот ресурс накапливается с течением времени или может быть увеличен путем продажи предметов через шаттл обратно.
  
'''Mechanism'''-class Assemblies are larger, but cannot fit so easily on your character. They are more suited for assemblies that could sit on a table and perform their function. They have twice the space and complexity of the '''Assembly'''-class.
 
  
'''Machine'''-class Assemblies are the largest and can be affixed to the floor and treated like a piece of furniature. These allow you to build the most complicated integrated circuits. They have four times the space and complexity of the '''Assembly'''-class.
+
'''Заказ'''
  
'''Drone'''-class Assemblies allow you to create robots that can move and interact with the world. They have three times the space and complexity of the '''Assembly'''-class.
+
Чтобы заказать новый ящик, нажмите на Консоль снабжения и выберите вкладку, с которой вы хотите сделать заказ. Найдите предмет и нажмите на него, затем решите, хотите ли вы распечатать квитанцию. Ящик теперь заказан для доставки. Если шаттл находится на борту, то вам нужно отослать его обратно. Когда Шаттл снабжения отправится из удаленного места в ангар, он будет содержать ящик. Кроме заказа, в ящике будет манифест.  
  
Additionally, there are two '''wall-mounted''' assemblies, which resemble screens that can be attached to a wall. They have twice the space and complexity of the '''Assembly'''-class.
+
Мониторьте время прибытия и отбытия шаттла.
  
As assemblies get larger they also take more steel to create from the printer.
+
'''Продажа'''
  
Below is a table that lists each assembly and what special features it has.
+
Если шаттл снабжения содержит ящики, то по прибытии обратно в удаленное местоположение, они будут проданы. Это полезно для получения дополнительных очков снабжения;  количество очков снабжения может быть увеличено путем возврата пустого ящика, содержащего манифест поставки. Манифест должен быть проштампован оранжевой грузовой резиновой печатью, резиновой печатью квартирмейстра или любым штампом руководителя отдела.
  
{| class="wikitable"
+
Вы также можете продавать заброшенные ящики, которые вы найдете в техтоннелях, чтобы получить значительное количество очков снабжения. В ящиках вы можете также поставлять некоторые выращенные растения, минералы (например, форон в слитках, золото, серебро, бриллианты), образцы с вирусами, а также диски со сканера минералов.
|-
 
! Assembly Name
 
! Description
 
|-
 
|-
 
|type-a electronic assembly
 
|It's a case, for building small electronics with.
 
|-
 
|type-b electronic assembly
 
|It's a case, for building small electronics with. This one resembles a pocket calculator.
 
|-
 
|type-c electronic assembly
 
|It's a case, for building small electronics with. This one has a clamshell design.
 
|-
 
|type-d electronic assembly
 
|It's a case, for building small electronics with. This one has a simple design.
 
|-
 
|type-e electronic assembly
 
|It's a case, for building small electronics with. This one looks like it has a belt clip. (Can fit in belt slot)
 
|-
 
|type-f electronic assembly
 
|It's a case, for building small electronics with. This one resembles a PDA. (Can fit in ID or belt slot)
 
|-
 
|augment electronic assembly
 
|It's a case, for building small electronics with. This one is designed to go inside a cybernetic augment. (Can shoot firearms, and be implanted using an integrated circuit augment)
 
|-
 
|type-a electronic mechanism
 
|It's a case, for building medium-sized electronics with.
 
|-
 
|type-b electronic mechanism
 
|It's a case, for building medium-sized electronics with. This one has a boxy design.
 
|-
 
|type-c electronic mechanism
 
|It's a case, for building medium-sized electronics with. This one has a clamshell design.
 
|-
 
|type-d electronic mechanism
 
|It's a case, for building medium-sized electronics with. This one resembles some type of medical apparatus.
 
|-
 
|type-e electronic mechanism
 
|It's a case, for building medium-sized electronics with. This one resembles a gun, or some type of tool, if you're feeling optimistic. It can fire guns and throw items while the user is holding it. (Can fire guns, and be anchored to the floor)
 
|-
 
|type-f electronic mechanism
 
|It's a case, for building medium-sized electronics with. This one resembles an old radio.
 
|-
 
|type-a electronic machine
 
|It's a case, for building large electronics with.
 
|-
 
|type-b electronic machine
 
|It's a case, for building large electronics with. This one resembles an oscilloscope.
 
|-
 
|type-c electronic machine
 
|It's a case, for building large electronics with. This one resembles a computer terminal.
 
|-
 
|type-d electronic machine
 
|It's a case, for building large electronics with. This one resembles a robotic arm.
 
|-
 
|type-e electronic machine
 
|It's a case, for building large electronics with. This one has a tall design.
 
|-
 
|type-f electronic machine
 
|It's a case, for building large electronics with. This one resembles some kind of industrial machinery.
 
|-
 
|type-a electronic drone
 
|It's a case, for building mobile electronics with.
 
|-
 
|type-b electronic drone
 
|It's a case, for building mobile electronics with. This one is armed and dangerous.
 
|-
 
|type-c electronic drone
 
|It's a case, for building mobile electronics with. This one resembles a Securitron.
 
|-
 
|type-d electronic drone
 
|It's a case, for building mobile electronics with. This one resembles a Medibot.
 
|-
 
|type-e electronic drone
 
|It's a case, for building mobile electronics with. This one has a generic bot design.
 
|-
 
|type-f electronic drone
 
|It's a case, for building mobile electronics with. This one has a hominoid design.
 
|-
 
|heavy wall-mounted electronic assembly
 
|It's a case, for building large electronics with. It has a magnetized backing to allow it to stick to walls, but you'll still need to wrench the anchoring bolts in place to keep it on.
 
|-
 
|light wall-mounted electronic assembly
 
|It's a case, for building small electronics with. It has a magnetized backing to allow it to stick to walls, but you'll still need to wrench the anchoring bolts in place to keep it on.
 
|}
 
  
== Components ==
+
<gallery mode="slideshow">
There are many categories of component, below they will be listed along with a brief description of what you can expect from each category.
+
File:Supply_management_1.png|
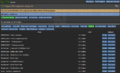
Выберите нужные предметы из списка
 +
File:Supply_management_4.png|
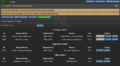
Просмотрите список заказов
 +
File:Supply_management_2.png|Отправьте шаттл на дальнюю базу за товарами. Как только он прибудет туда, отправьте его обратно в корабельный ангар
 +
File:Supply_shuttle.png|
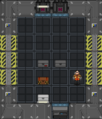
Выгрузите ящики из шаттла
 +
File:Supply_management_3.png|
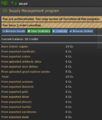
Загрузите на шаттл ящики с манифестами. Как видно, вы можете получить за это дополнительные очки снабжения.
 +
</gallery>
  
{|  class="wikitable"
+
== Доставка ==
! Category
 
! Description
 
|-
 
| Power - Passive
 
| Generate power for your integrated circuit.
 
|-
 
| Input
 
| Everything to input information to your circuit, from number/text pads to item sensors to atmospheric analyzers.
 
|-
 
| Output
 
| Display something, through screens, lights, sounds.
 
|-
 
| Arithmetic
 
| Everything you need to perform mathematical operations.
 
|-
 
| Converter
 
| Integrated circuits are type-based, with strings, numbers, references. These components let you convert between them, or otherwise manipulate variables.
 
|-
 
| Data Transfer
 
| A series of multiplexers and demultiplexers of varying sizes.
 
|-
 
| Filter
 
| Lets you filter your variables for specific types, such as only allowing item references through and excluding players.
 
|-
 
| Lists
 
| Construct and manipulate lists.
 
|-
 
| Logic
 
| Contains circuits for boolean logical operations.
 
|-
 
| Manipulation
 
| Circuits to manipulate items, move your assembly, allow AI control or create bluespace portals. 
 
|-
 
| Memory
 
| Store variables.
 
|-
 
| Power - Active
 
| Send power from your assembly's battery elsewhere.
 
|-
 
| Reagent
 
| Manipulate liquids within the assembly.
 
|-
 
| Smart
 
| Pathfinding tools for mobile assemblies.
 
|-
 
| Time
 
| Tickers, delays and time circuits.
 
|-
 
| Trig
 
| Trigonometric functions.
 
|-
 
| Assemblies
 
| Contains all the assembly designs mentioned above.
 
|-
 
| Tools
 
| Contains all the tools mentioned above, as well as data cards.
 
|}
 
  
== Circuit Design ==
+
Есть четыре основных способа выполнить доставку:
  
Once you have decided on your assembly type, and what you want your circuit to do - It is time to print all the components and insert them into your assembly. Once this is done, use the [[File:wirer-wire.png]] Circuit Wirer on the open assembly casing to open the assembly internals screen.
+
'''Вручную'''
  
=== Assembly Internals Screen ===
+
Иногда не остается других вариантов, кроме как самостоятельно притащить ящик туда, куда нужно. Помните, вы не можете поднять ящик по лесенке, поэтому пользуйтесь лифтом и ступеньками.
[[File:Sample_assembly_1.PNG|thumb|center|upright=3.0|In-game UI showing an integrated circuit components screen.]]
 
  
On this screen you will see a list of the current complexity and space, and their maximum, the power cell status, as well as a list of the installed components.
+
'''Пневмопочтой'''
  
 +
Сброс мусора и доставка посылок осуществляется по разветвленной системе пневмотруб. Таким образом вы можете доставить посылку туда, где есть мусоросброс.
  
=== Component Screen ===
+
Чтобы воспользоваться, возьмите оберточную бумагу и оберните ящик или шкаф, который вы хотите отправить. Затем взаимодействуйте с маркировщиком посылок (Destination tagger), чтобы установить пункт назначения. Промаркируйте посылку. Положите ящик на один из двух ленточных конвейеров и отправьте его.
  
 +
Таким образом вы можете безопасно отправить своего сообщника в шкафчике в кабинет главы отдела или даже капитана.
  
Clicking on any component will bring up that component's settings, wiring and a description of what it does. In this screen you can also rename, copy the reference of or remove that component.
+
Этот способ доставки будет работать только если пневмотрубы не повреждены.
  
[[File:Adv_med_scanner_circuit.PNG|thumb|center|upright=3.0|In-game UI showing the Advanced Medical Scanner Circuit]]
+
'''Карго-поезд'''
  
Here we have an example of one of the medical scanner components, which when used on a target will give the assembly information on its health.
+
На складе в начале раунда будет грузовой буксир, прикрепленный к двум тележкам. Вы можете переместить ящик на тележку, перетянув его мышкой. Это может помочь вам быстро перемещать большое количество ящиков по кораблю. Буксир может нуждаться в перезарядке после длительного использования. Вы также можете заказать новые буксиры или дополнительные тележки. Ключи можно извлечь из замка зажигания, чтобы никто не позаимствовал его. Очевидно, он не может перемещаться по вертикальным лестницам. Также он застрянет на ступеньках, а вытащить его оттуда непросто. Карго-поезд может перемещаться на лифте.
  
On the left side of the screen we see ''<REF> target (null)'' - This means we need to provide the circuit with a target reference as an input. Currently we have ''null'' or nothing input. Using another component such as a sensor and wiring it to the medical scanner circuit, we can provide it with a reference. Variables are always written in the format ''<Type> name (current)''. Types can be ''Any, REF, String, NUM or BOOL'' - And you can only connect compatible pins together. If you wish to send the output of a NUM pin to, for example, a screen for display - Then you will have to pass it through a num to string component first to change the type.
+
'''Доставка с помощью экзокостюма'''
  
In the center we have the pulse pins, these tell the circuit when to trigger and where to send out a pulse when it operates. We might wire the scan pin to a sensor output trigger, so that when we have scanned something and we know that the reference will be passed to the medical scanner, we tell the medical scanner to operate using that reference. Then we could use the output of the medical scanner to trigger another component such as a screen to display the scan.
+
Если отдел роботехники соорудил погрузчик с захватами, и вы знаете как им управлять, то можете использовать его.
 
 
=== Connecting Components ===


Connect the components using the [[File:wirer-wire.png]] Circuit Wirer. It has two modes, Wire and Unwire, which can be toggled with {{kp|Z}} or by clicking on the Wirer. To wire or unwire, click on the two pins you wish to wire/unwire. They must be compatible, i.e. You cannot wire a pulse pin to a variable pin, nor can you connect pins with incompatible types. Pins can have multiple connections.


[[File:Modulo_chip_example.PNG|thumb|center|upright=3.0|Example of a connected circuit, this modulus circuit forms part of a looping counter circuit in a medical scanner assembly. It allows the assembly to cycle through all the damage types on a loop.]]


Occasionally, you will not want to connect a pin to anything - But you will still want it to have a variable. This may be the case with a ticker that you always want to be on, so it requires a ''<BOOL> True'' on the input. You can achieve this using the [[File:Debugger.png]] Circuit Debugger. Double-click the Debugger in-hand to open a menu to allow you to select a variable type, select the variable you want and then input the value. Then click on the appropriate pin with the debugger to set the value. An example of this can be seen in the above image, in which pin ''<NUM> B'' is permanently set to 7. The debugger can also be used to pulse a trigger pin to allow you to test out your circuit.


== Sample Circuits ==


<div class="toccolours mw-collapsible mw-collapsed">
 
'''Grabber Augment''' - Allows storage of small items within itself.
 
<div class="mw-collapsible-content">
 
{"assembly":{"type":"type-d electronic assembly"},"components":[{"type":"grabber","inputs":[[2,0,1]]},{"type":"ranged sensor"},{"type":"button","name":"Drop All"},{"type":"memory chip","inputs":[[1,0,-1]]},{"type":"memory chip","inputs":[[1,0,1]]}],"wires":[[[1,"I",1],[2,"O",1]],[[1,"I",2],[4,"O",1]],[[1,"I",2],[5,"O",1]],[[1,"A",1],[2,"A",1]],[[1,"A",1],[4,"A",2]],[[1,"A",2],[5,"A",1]],[[3,"A",1],[4,"A",1]]]}
 
</div>
 
'''Wall-based Medical Scanner''' - Scans the person standing infront of it for medical problems. Note that it has delays to allow for logic gate operation without issues.
 
<div class="mw-collapsible-content">
 
{"assembly":{"type":"heavy wall-mounted electronic assembly","name":"EZ-MED Scanner 1.0","detail_color":"#e2e2e2"},"components":[{"type":"integrated adv. medical analyser"},{"type":"adjacent locator"},{"type":"button"},{"type":"greater than gate","name":"Greater Than Damage","inputs":[[1,0,0],[2,0,0]]},{"type":"eight multiplexer","name":"Damage Type Name","inputs":[[1,0,8],[2,0,"Brute Damage"],[3,0,"Burn Damage"],[4,0,"Toxin Damage"],[5,0,"Oxygenation Damage"],[6,0,"Genetic Damage"],[7,0,"Pulse Level: 84"],[8,0,"Pain Level"],[9,0,"Radiation Level"]]},{"type":"eight multiplexer","name":"Damage Type Number","inputs":[[1,0,8],[2,0,0],[3,0,0],[4,0,0],[5,0,0],[6,0,0],[7,0,84],[8,0,0],[9,0,0]]},{"type":"addition circuit","name":"Counter Adder","inputs":[[1,0,7],[2,0,1]]},{"type":"modulo circuit","name":"Counter Modulus","inputs":[[1,0,7],[2,0,8]]},{"type":"memory chip","name":"Counter Memory","inputs":[[1,0,7]]},{"type":"addition circuit","name":"Multiplex Incrementer","inputs":[[1,0,7],[2,0,1]]},{"type":"small concatenator","name":"Text Adder","inputs":[[1,0,"Pulse Level: 84\n"],[2,0,"Radiation Level"],[3,0,"\n"]]},{"type":"equal gate","name":"Count Finished Check","inputs":[[1,0,8],[2,0,8]]},{"type":"half-sec delay circuit","name":"Screen Update Delay"},{"type":"memory chip","name":"Screen Reset"},{"type":"tenth-sec delay circuit","name":"Equals Delay"},{"type":"tenth-sec delay circuit","name":"Adder Delay"},{"type":"small screen","name":"Output Screen","inputs":[[1,0,"Pulse Level: 84\n"]]},{"type":"tesla power relay"},{"type":"tesla power relay"},{"type":"small concatenator","name":"Pulse Concat","inputs":[[1,0,"Pulse Level: "],[2,0,"84"]]},{"type":"number to string","name":"Pulse Num2String","inputs":[[1,0,84]]}],"wires":[[[1,"I",1],[2,"O",1]],[[1,"O",3],[6,"I",2]],[[1,"O",4],[6,"I",3]],[[1,"O",5],[6,"I",4]],[[1,"O",6],[6,"I",5]],[[1,"O",7],[6,"I",6]],[[1,"O",8],[6,"I",7]],[[1,"O",8],[21,"I",1]],[[1,"O",10],[6,"I",8]],[[1,"O",11],[6,"I",9]],[[1,"A",1],[2,"A",2]],[[1,"A",2],[7,"A",1]],[[1,"A",2],[21,"A",1]],[[2,"A",1],[3,"A",1]],[[3,"A",1],[14,"A",1]],[[4,"I",1],[6,"O",1]],[[4,"A",1],[6,"A",2]],[[4,"A",2],[11,"A",1]],[[5,"I",1],[10,"O",1]],[[5,"I",7],[20,"O",1]],[[5,"O",1],[11,"I",2]],[[5,"A",1],[10,"A",2]],[[6,"I",1],[10,"O",1]],[[6,"A",1],[10,"A",2]],[[7,"I",1],[9,"O",1]],[[7,"O",1],[8,"I",1]],[[7,"A",1],[16,"A",2]],[[7,"A",2],[8,"A",1]],[[8,"O",1],[9,"I",1]],[[8,"O",1],[10,"I",1]],[[8,"A",2],[10,"A",1]],[[8,"A",2],[9,"A",1]],[[10,"O",1],[12,"I",1]],[[10,"A",2],[15,"A",1]],[[11,"I",1],[11,"O",1]],[[11,"I",1],[14,"O",1]],[[11,"O",1],[17,"I",1]],[[12,"A",1],[15,"A",2]],[[12,"A",2],[13,"A",1]],[[12,"A",3],[16,"A",1]],[[13,"A",2],[17,"A",1]],[[14,"O",1],[17,"I",1]],[[20,"I",2],[21,"O",1]],[[20,"A",1],[21,"A",2]]]}
 
</div>
 
</div>


[[Category:Science Guides]]
 
[[Category:Engineering Guides]]
 
[[Category:Guides]]
 
[[Category:Science]]
 

Текущая версия на 20:55, 29 ноября 2019

Отдел снабжения состоит из руководителя - квартирмейстра или начальника палубы, карготехников и их ассистентов и шахтеров. Работа начальника и техников состоит в том, чтобы обслуживать ангар и шаттлы, а также обрабатывать заказы и транспортировать поставки из шаттла снабжения. Это руководство не распространяется на геологоразведчиков, у них есть отдельное руководство по добыче полезных ископаемых, и их взаимодействие с начальником палубы и техническими специалистами, как правило, заключается только в передаче добытых товаров для доставки. Руководить поставками напрямую может также капитан или Глава Персонала, при необходимости.

Грузовой отсек находится на нижней палубе, хотя складские работники могут доставлять посылки по всему кораблю. Они также имеют доступ к переработчику мусора на второй палубе, возле инженерного отдела.

Необходимые предметы[править]

В шкафчиках отдела снабжения можно найти:

  • Две гарнитуры, позволяющие получить доступ к каналу снабжения (:u).
  • Темные рабочие перчатки.
  • Оранжевый жилет (Помните, что вы должны носить такой жилет во время работы на посадочных площадках в ангаре!)
  • Большая разгрузка с карманами
  • Пояс для инструментов.
  • Ручной принтер этикеток.
  • Маркировщик для посылок (destination tagger)
  • Папки.
  • Упаковочная бумага (обычная и подарочная)
  • Жезл регулировщика
  • Резиновая печать карго-отдела для разрешений
  • Красная печать для запретов
  • Рюкзак
  • Сумка

Консоль управления поставками[править]

Консоль снабжения является центральной в вашем отделе и позволяет вам заказывать необходимое, управлять челноком для снабжения и просматривать историю заказов на поставку. Здесь вы можете узнать, что было заказано, когда и кем. Вы также можете распечатать ведомости заказов на поставку для сохранения и штамповки.

Вы также можете утверждать / отклонять заказы других людей, что является важной частью вашей работы. Не стоит просто утверждать всё без уважительной причины. Или можно наоборот завоевать общее признание, поставляя дорогие товары просто так.

Эта консоль также позволяет проверить текущее количество очков поставки. Этот ресурс накапливается с течением времени или может быть увеличен путем продажи предметов через шаттл обратно.


Заказ

Чтобы заказать новый ящик, нажмите на Консоль снабжения и выберите вкладку, с которой вы хотите сделать заказ. Найдите предмет и нажмите на него, затем решите, хотите ли вы распечатать квитанцию. Ящик теперь заказан для доставки. Если шаттл находится на борту, то вам нужно отослать его обратно. Когда Шаттл снабжения отправится из удаленного места в ангар, он будет содержать ящик. Кроме заказа, в ящике будет манифест.

Мониторьте время прибытия и отбытия шаттла.

Продажа

Если шаттл снабжения содержит ящики, то по прибытии обратно в удаленное местоположение, они будут проданы. Это полезно для получения дополнительных очков снабжения; количество очков снабжения может быть увеличено путем возврата пустого ящика, содержащего манифест поставки. Манифест должен быть проштампован оранжевой грузовой резиновой печатью, резиновой печатью квартирмейстра или любым штампом руководителя отдела.

Вы также можете продавать заброшенные ящики, которые вы найдете в техтоннелях, чтобы получить значительное количество очков снабжения. В ящиках вы можете также поставлять некоторые выращенные растения, минералы (например, форон в слитках, золото, серебро, бриллианты), образцы с вирусами, а также диски со сканера минералов.

Доставка[править]

Есть четыре основных способа выполнить доставку:

Вручную

Иногда не остается других вариантов, кроме как самостоятельно притащить ящик туда, куда нужно. Помните, вы не можете поднять ящик по лесенке, поэтому пользуйтесь лифтом и ступеньками.

Пневмопочтой

Сброс мусора и доставка посылок осуществляется по разветвленной системе пневмотруб. Таким образом вы можете доставить посылку туда, где есть мусоросброс.

Чтобы воспользоваться, возьмите оберточную бумагу и оберните ящик или шкаф, который вы хотите отправить. Затем взаимодействуйте с маркировщиком посылок (Destination tagger), чтобы установить пункт назначения. Промаркируйте посылку. Положите ящик на один из двух ленточных конвейеров и отправьте его.

Таким образом вы можете безопасно отправить своего сообщника в шкафчике в кабинет главы отдела или даже капитана.

Этот способ доставки будет работать только если пневмотрубы не повреждены.

Карго-поезд

На складе в начале раунда будет грузовой буксир, прикрепленный к двум тележкам. Вы можете переместить ящик на тележку, перетянув его мышкой. Это может помочь вам быстро перемещать большое количество ящиков по кораблю. Буксир может нуждаться в перезарядке после длительного использования. Вы также можете заказать новые буксиры или дополнительные тележки. Ключи можно извлечь из замка зажигания, чтобы никто не позаимствовал его. Очевидно, он не может перемещаться по вертикальным лестницам. Также он застрянет на ступеньках, а вытащить его оттуда непросто. Карго-поезд может перемещаться на лифте.

Доставка с помощью экзокостюма

Если отдел роботехники соорудил погрузчик с захватами, и вы знаете как им управлять, то можете использовать его.